

LEX51S
-
Posts
1,581 -
Joined
-
Last visited
-
Days Won
3
Content Type
Profiles
Forums
Events
Gallery
News & Articles
Videos
Posts posted by LEX51S
-
-
That would be great lance but i believe as you suggest the logic will work through the interior light cable reed switch only. Additional cables for "chimes" would not be feasible cost and labour.
What i dont understand is. Which door chime. it chimes for many different reasons. do you want to disable it for all these warnings or a particular warning. I found the moon roof one to be annoying but other then that they all have a valid reason to "chime"
-
Hi all,
Just a question. I have been getting consistently about 750Km and that will usually take me close to 0 (zero) on the remaining range indicator. When I go fill up, I only fill up about 35L which means I should still have around 10L (45L tank) left which should allow me to do around 200km (based on average 4.8L/100km usage) past the 0 mark on the trip computer.
Has anyone tried driving past the 0 mark on the trip computer range indicator?
The Range is an average on your typical driving style. It is said not to reflect the l/100km but "driving Style". (This is what i have been told and read)
does your gauge show different when range says zero??
-
just incase moon roof stops working and is in the open position, as mentioned before ,with the Audi A4, the opption is advaible to close thr roof .
Audi musnt put as much faith in thier operating gear as lexus do.
-
There should be a way to play the rear entertainment through the rear speakers only and Mum and or dad be able to have music in front.
However!! I dont have an RX so i cant tell you how to do this. Ask at your next service or next time your driving past a dealer.
-
The Greddy SE used to be Marketed on its quiteness.
My Greddy was very subtle.
Dont know about tanabe
-
There shouldnt be a need for it? I dont believe there is one? Why do you ask?
-
australia day bbq??
-
^ how much % tint is that?
im interested in getting 20% all round on mine
or maybe 10% rear 20% front
Thats 5% on all of the windows and then i actually got the front widscreen tinted 35% to block out all the light coming in so u cannot see in from any angle.. Makes it alot cooler inside aswel but hard to see out the back at night..
Thats Illegal and instant defect in NSW.
Yeh its the same in sa aswel.. But i like it so no one can see in.. Plus if i get it defected ill take it off and get it passed then put it back on.. Not an issue for me..
Haha. If you clear a defect and re do it again in NSW your car gets impounded.
-

some guy named chris did that :)
Heard he not a bad bloke!! Looks much better nice choice!
-
this is a intresting video
^^ Like ^^
-
-
-
-
-
-
-
-
-
-
-
^ how much % tint is that?
im interested in getting 20% all round on mine
or maybe 10% rear 20% front
Thats 5% on all of the windows and then i actually got the front widscreen tinted 35% to block out all the light coming in so u cannot see in from any angle.. Makes it alot cooler inside aswel but hard to see out the back at night..
Thats Illegal and instant defect in NSW.
-
Guys i found this post you might be interested in!! Its for an RX but the skills are transferable. Although i didnt get this involved in the driveway
Hello Everyone,
I know IACV has been a huge topic on the forum and I have found various pictures in the RX forum and ES forum on the idle air control valve (IACV) or as others call it the idle speed control valve (ISC). However, I have not found a "step by step" posting to date which definitively shows how to clean this thing so that my car stops giving me idling problems.
Symptoms I have had included:
- low and rough idling that would cause the car engine to start shaking after starting the car
- this eventually got worse to the point that when I start my car, it would not idle unless I gave it gas
- idling problems for me tended to occur more often after my engine was warm or had been sitting in the sun
I hope these series of postings help you fellow LOC members out there. You've certainly helped me in the past so here's my two cents at this common problem. Additionally, the instructions I give are the way in which I have cleaned it myself. As you go about and attempt this, you may find better ways to do so. Please add and refine my instructions/terminology as needed. I am not a professional. I've only changed my oil, air filters, and conducted minor maintenance previously. The bottom line is that if you have the right tools, you should be able to do this. This discovery/ cleaning took me about 2 hours to do cause I ran into problems and there were major steps left out in previous postings that I’ve encountered read. The next time I do this, I believe I can get this done in about an hour or less.
Tools Needed:
1) Tightly fitting Philips Screw Driver
2) Carb cleaner that is O2 sensor safe (I've seen CRC. I used Valvoline Carb Cleaner)
3) Locking Grip Pliers (definitely helped me remove the factory tight screws)
4) Small brush for cleaning
5) Towels for cleaning
6) Pliers (help removed brackets holding the hoses)
7) Latex gloves helps with limit the messiness.
* I used the same gasket and did not replace it. No problems found.
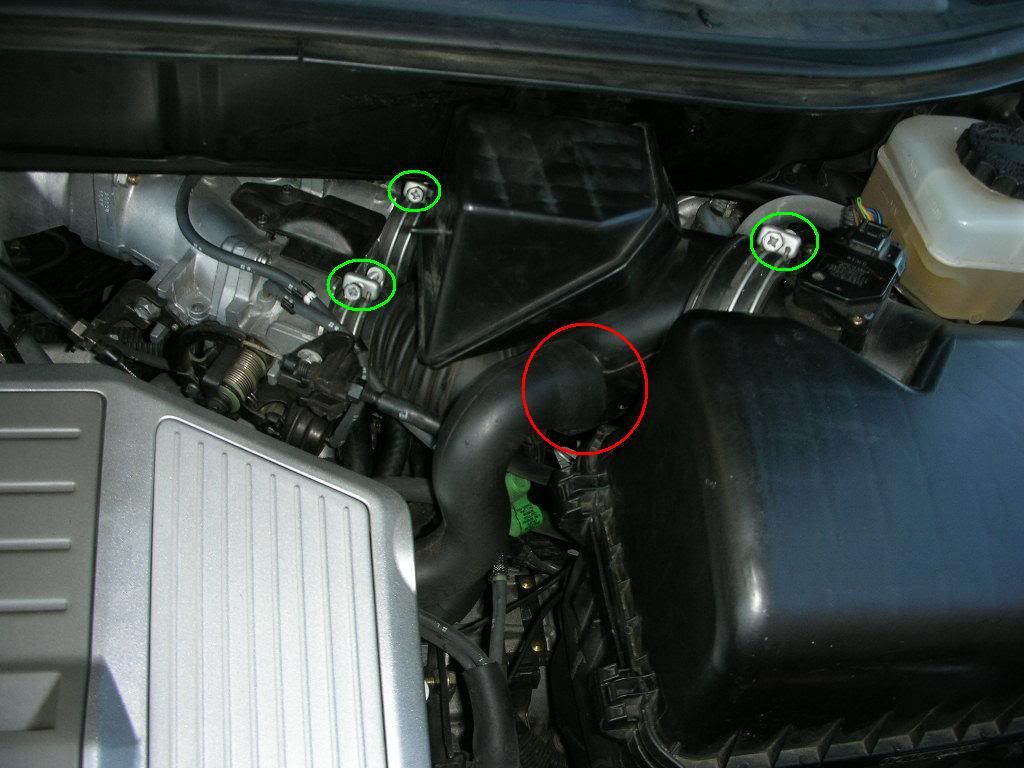
1) Remove the hose that comes from the engine/motor that connects to the air intake hoses.( Hose is below in red – we’ll refer to this as Hose A) When you pull back the rubber hose covering, you will see that a metal bracket is holding the hose pretty tightly in place. Use the pliers to clasps the two metal pieces together to loosen the bracket and pull the hose loose. You can also do this by hand if it’s easier for you.
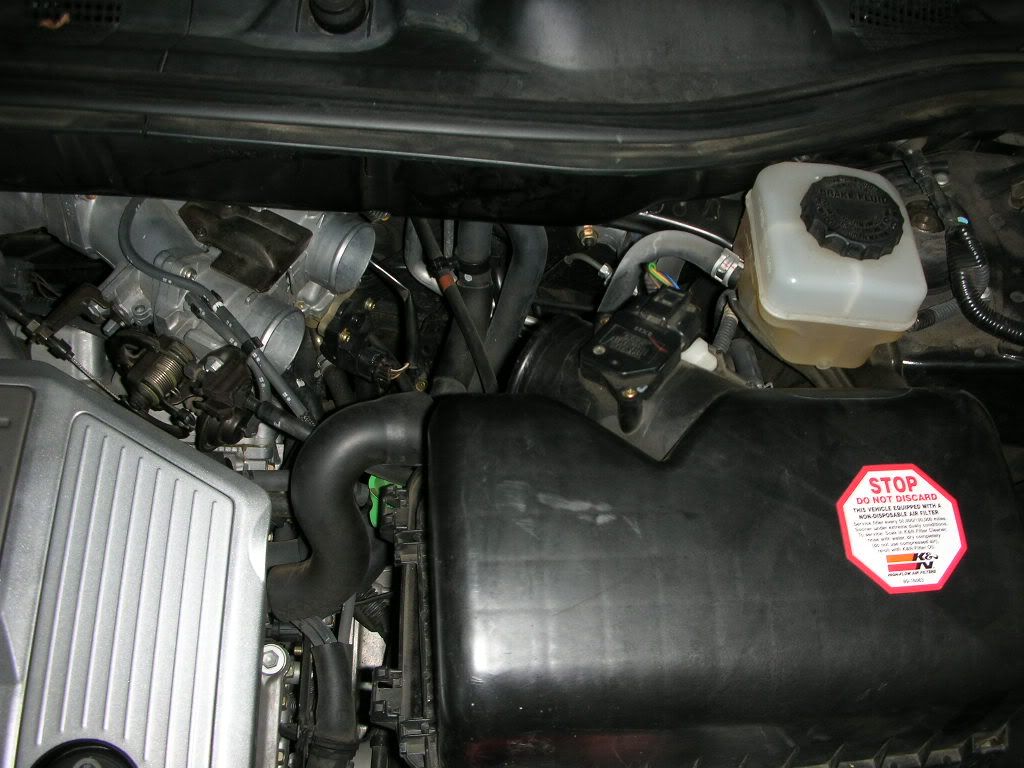
2) Upon removing the hose, you will want to remove the two air intake hoses. Loosen the three screws above in green and remove the hose. Below is a picture of the intake hoses removed.
3)After removing the intake hoses, I opened the lid to the air filter and moved this to the side of the car to create more working room. I believe there are two clips on the right holding the lid in place. Just pop the two clips and move the cover to the side. I also took out the air filter and temporarily moved this to the side.
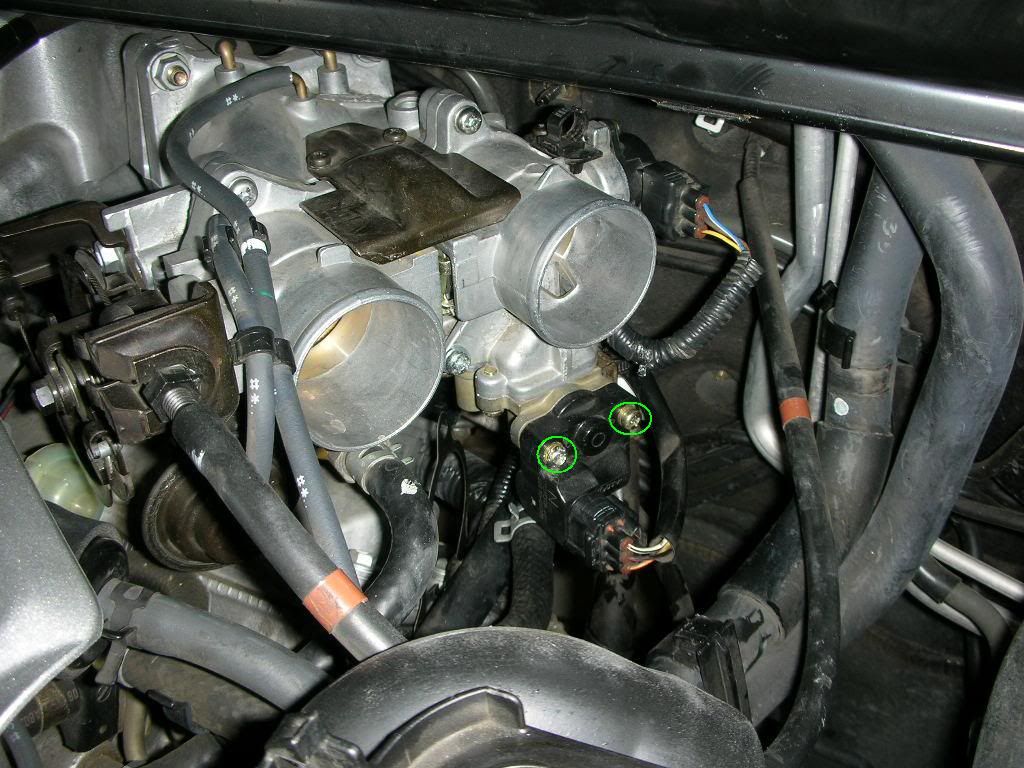
4)After removing the intake hose, the throttle body/IACV/black electric coil is revealed. At this point, I removed the black electric wire from the black coil. Once the electric wire is removed you can remove the black coil from the IACV by removing the two screws. Note, the screws are factory tight so use a tight fitting screw driver to remove the screws. One of my screws was partially stripped from the dealership’s work, so I had to resort to my locking grip pliers which helped out tremendously. After removing the two screws, the black electric piece pops right off. When the black electrical coil is removed from the IACV, it exposes a small pencil sized metal stud. You will also notice a washer that sits on this stud. Don’t lose this washer. Take it and put it aside so it doesn’t fall off when you continue on in the next steps.
5)Additionally, I removed the hose coming out of the IACV. We’ll call this Hose B. This hose can be removed in the same manner by clamping the bracket and pulling the hose out. You will see that the hose is removed below. Below are pictures of before and after.
6)Here is where the fun begins. I initially attempted to remove the four screws attached to the IACV at this point, but found that after an hour, this would be nearly impossible to remove considering the location of the screws were in an extremely tight spot. The only way I would be able to remove the IACV is to remove right throttle body. Not as tough as it sounds. Three screws need to be removed to accomplish this. Again, be careful when removing the screws. Also you will see I removed another electric plug and I also cut a tie wrap. Once you complete these steps, the throttle body/ IACV comes out pretty easily. Note when you remove the throttle body, there will be one LAST hose connected to the IACV. Be careful when you remove this hose as radiator fluid may spill. Some of my fluid spilled out so I just refilled my coolant after I was done.
7)Below is a picture of the bottom view of the IACV. You now can EASILY remove the four screws connecting the IACV to the throttle body . In the picture below, I have already removed one of the screws.
Once the four screws are removed the IACV and throttle body separate. Now you can clean both of them with your carb cleaner, brush, towels, cotton swabs etc…. Picture here is before I the cleaning with all the muck inside
Pictures after I cleaned the IACV and throttle body
This last picture is the post throttle body cleaning
8) Once you are done cleaning, just put back the throttle body/iacv the same way you took it off, and put everything back in reverse order. Ensure the gasket is in place. Also, ensure you put the washer back on the electric coil. Make sure you place hose A & B back and ensure the electric plugs are back in their original position. Once these things are in place, then it's all about putting the air filter/hoses back and you are good to go. If you have lost any coolant, make sure you refill it to a safe level.
After completing this cleaning, my car starts up without any problem and idles as if I just purchased the car brand new. Replacing this at a dealership would have costed me $300-400 easily. Let me know if you have any questions. Cheers (Also, I tried to post these as separate replys, but the software combined all my replies into a single reply and did not keep them separated)
*Edited the posting to have the pictures follow step by step in sequential order*
-
to be honest i have never stuck my head under there haha.
Do you know if your car was in an accident?
-
Sam and Peter are really good there they will look after you. your car will be like new after you leave there.


Is250 Dash Wiring Harness? Auto And Manual Different?
in Lexus IS250 / Lexus IS250C / Lexus IS350 / Lexus IS350C Club / Lexus IS-F / IS300h
Posted
^ +1