Jump to content

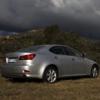
Quick Tutorial - Installing Mtec Hid Kit On My 2008 Is 250


Recommended Posts

I've recently got an HID kit from Mtec on eBay, these guys have good feedback scores and looks like their prodcts are better than the average generic craps that may break evey now and then. Anyway, the installation of the wires and bulbs was fairly smooth and problem-free. The tricky part is actually to find a right place for the ballasts. The Mtec kit comes with 4 mounting brackets and I used them to mount the ballasts on top of that shock-absorber mount thingy. The only problem I had with the kit was the length of the power cords. They are just about say 5cm too short so I had to turn the ballasts slightly and only put one set of nut and bolt for each ballast.

I recommend their 6000K bulbs as they give you perfect white light with just very very slight tinge of blue at the edge of the light pattern. I've also changed the small position lights in near the high beam, I've put in Philips 4000K w5w bulbs, they look less yellow than the stock ones but are still far too yellow compared to the HID lights. Maybe the LED bulbs on eBay can be a good compliment to the HID. Also, the HID bulbs are considerably brighter than the stock halegon, I turned the levelling knob to 3 to not to piss off any incoming traffic. Also, quite frankly I don't belive these Mtec kits are made in Japan as the seller claims. It looks to me they are either made in China or Taiwan. I'm an electronics engineer and I think the quality of the Mtec kit is very good. Hope they can last a few years.

Things you need to prepare before the instalation:

1. The HID kit, of course

2. 10mm socket that's long enough to reach the base of the air filter

3. screw driver

4. silicone sealant

5. drill and 25mm spade drill bit and sand paper

6. some cable fasteners

Installation steps:

1. remove the engine cover, refer to the menu for this, and it's simple, just secure the fastener as they may cost you $$ if you loose them

[passenger side]

2. I did the passenger side first, unscrew the top of the windscreen washer reservoir filler, turn and pull the filler and the pipe gently, and remove the filler and the filler pipe.

3. remove the cover to the light housing that is on the side of the car, that's for the low beam.

4. drill a hole in the cover with a 25mm drill bit. Sand the drill edge smooth

5. remove the factory bulb by turning it xxxxxx-wise and pull it out. Disconnect the wire on the factory bulb from the gray socket.

6. disconnect the bulb from the short wire, place all wires through the drill hole on the light cover.

7. Attach the wire to the power cord from the HID kit. You'll need to push the pin of the power cord in the provided white socket, and make sure your blue wire from the factory power cord is connect to the red wire of the HID kit's power cord.

8. apply a good amount silicone sealant around the rubber seal and the hole you drill on the light cover.

9. place the HID bulb in the light housing socket, do this gently and don't break the bulb, you need to look carefully at the socket as the three arms of the bulb base are uneven.

10. when the bulb is securely installed, apply sillicone sealant inside the rubber sealto seal the wires and the rubber seal

11. close the light housing cover tight and connect the wires (there are three sockets you need to connect and trust me you won't get this wrong)

12. put the filler pipe back to the windscreen washer reservoir

[driver side]

13. remove the screw and the fastener on the air-intake and gently remove the air-intake

14. remove the two screws on the air-filter and remove the fastener on the air-filter hose

15. disconnect the wire going to the air-filter

16. remove the air-filter

17. you now have access to the light housing on the driver side, repeat from steps 3 to 11

18. put the air-filter back and DO NOT FORGET to reconnect that damn wire to the air-filter or you'll have the bloody "Check VSC" thrown on your dash and only disconnect your battery can fix it.

19. test the new HID lights

20. replace all engine covers

Some pictures:

the hole drilled on the light housing cover:

post-3274-1257762730_thumb.jpg

ballast installed on the passenger side:

post-3274-1257762750_thumb.jpg

how the mtec 6000K looks like on IS250

post-3274-1257762974_thumb.jpg

stock halogen (driver side) vs 6000K HID (passenger side)

post-3274-1257763390_thumb.jpg

Link to comment
Share on other sites

Nice write up Invisigoth!!

I have to agree, finding good spots for the ballasts is probably the most difficult part of the whole install! I remember asking FrankyX the same question re. where to mount them!!

I mounted the drivers side ballast in front of the air box. Nice spot that was out of the way, and did not inhibit access to the filter cover! I utilised the front airbox bolt to secure the bracket for the ballast!

As for the passenger side, I will be honest and admit that I cable tied it to the conduit covered loom that run alongside the filler tube. Its the stiff loom!!

One thing that I will add to your tut, when re-installing the filler tube, twist and push down grabbing hold as far down the tube as possible. This should ensure that the tube clicks back onto the reservoir!!

Again mate, great job with the write up!!!

I will leave your tutorial here for a day or two and then pin it with the others for refer!!

Link to comment
Share on other sites

Good work, great write up.

I agree with the parkers looking too yellow. I swapped to LED and actually found that they were too blue for the 6000K HID. Sounds strange, but I didn't like the look, it looked too modified. I ended up going with a Philips crystalvision / 5000k bulb for the parkers & fogs. From a distance, looks very nice and not as yellow as standard.

Another problem with the LED I found was that I was constantly changing them as they were always blowing. No such dramas with the philips bulbs though.

Thanks mate.

LEDs typically operate on 2-3 volts but normal automotive light bulbs work on 12 volts. I guess the LED bulbs need to have some sort of voltage regulation circuit to bring 12V down to 3V. I guess it might be the circuit that keeps on blowing rather than the LED. Do they look like they are burnt if they blew? I couldn't find any Philips crystalvision parkers here in Canberra and funny enough, only a few shops carry Philips bulbs here. Did you get these off the Internet or from your local shops? I still dare not to change the fogs to 6000K as Canberra can be quite foggy some time.

One other thing that concerns me is how durable these ballasts are. HIDs run on AC at a few hundred hertz and the ballasts are important to supply the electricity the HID bulbs need. It would be interesting to hear those to say about their stock HIDs. I know Honda has put HIDs on their Accord Euros for a long time, are they durable?

Link to comment
Share on other sites

Great job invisigoth.

Please let me add something on your installation guide :)

Step 1a: Disconnect the Negative Battery Terminal :) :) just for safety.

1b. remove the engine cover, refer to the menu for this, and it's simple, just secure the fastener as they may cost you $$ if you loose them

[passenger side]

2. I did the passenger side first, unscrew the top of the windscreen washer reservoir filler, turn and pull the filler and the pipe gently, and remove the filler and the filler pipe.

3. remove the cover to the light housing that is on the side of the car, that's for the low beam.

4. drill a hole in the cover with a 25mm drill bit. Sand the drill edge smooth

5. remove the factory bulb by turning it xxxxxx-wise and pull it out. Disconnect the wire on the factory bulb from the gray socket.

6. disconnect the bulb from the short wire, place all wires through the drill hole on the light cover.

7. Attach the wire to the power cord from the HID kit. You'll need to push the pin of the power cord in the provided white socket, and make sure your blue wire from the factory power cord is connect to the red wire of the HID kit's power cord.

8. apply a good amount silicone sealant around the rubber seal and the hole you drill on the light cover.

9. place the HID bulb in the light housing socket, do this gently and don't break the bulb, you need to look carefully at the socket as the three arms of the bulb base are uneven.

10. when the bulb is securely installed, apply sillicone sealant inside the rubber sealto seal the wires and the rubber seal

11. close the light housing cover tight and connect the wires (there are three sockets you need to connect and trust me you won't get this wrong)

12. put the filler pipe back to the windscreen washer reservoir

[driver side]

13. remove the screw and the fastener on the air-intake and gently remove the air-intake

14. remove the two screws on the air-filter and remove the fastener on the air-filter hose

15. disconnect the wire going to the air-filter

16. remove the air-filter

17. you now have access to the light housing on the driver side, repeat from steps 3 to 11

18. put the air-filter back and DO NOT FORGET to reconnect that damn wire to the air-filter or you'll have the bloody "Check VSC" thrown on your dash and only disconnect your battery can fix it.

18b. reconnect the Negative battery terminal :) (So 'Check VSC' will not ON)

19. test the new HID lights

20. replace all engine covers

Once again, great job invisigoth!!!!

Link to comment
Share on other sites

Great job invisigoth.

Please let me add something on your installation guide :)

Step 1a: remove the Negative Battery Terminal :) :) just for safety.

18b. reconnect the Negative battery terminal :) (So 'Check VSC' will not ON)

Thanks mate. Just one thing to add if you disconnect the negaive battery terminal. You'll need to initialise the power windows by winding each of them halfway down and then fully up and hold the switch for a couple of seconds until the light on the switch stops flashing. This is written on the owner's manual.

Link to comment
Share on other sites

  • 11 months later...

Hi,

I have recently bought the same MTEC HID Kit on ebay with 8000k for Lexus IS250. The installation was done, the light works, but later, the fuse gets blown very easily, Can someone please explain why this is happening and how to fix it?

Thanks

I've recently got an HID kit from Mtec on eBay, these guys have good feedback scores and looks like their prodcts are better than the average generic craps that may break evey now and then. Anyway, the installation of the wires and bulbs was fairly smooth and problem-free. The tricky part is actually to find a right place for the ballasts. The Mtec kit comes with 4 mounting brackets and I used them to mount the ballasts on top of that shock-absorber mount thingy. The only problem I had with the kit was the length of the power cords. They are just about say 5cm too short so I had to turn the ballasts slightly and only put one set of nut and bolt for each ballast.

I recommend their 6000K bulbs as they give you perfect white light with just very very slight tinge of blue at the edge of the light pattern. I've also changed the small position lights in near the high beam, I've put in Philips 4000K w5w bulbs, they look less yellow than the stock ones but are still far too yellow compared to the HID lights. Maybe the LED bulbs on eBay can be a good compliment to the HID. Also, the HID bulbs are considerably brighter than the stock halegon, I turned the levelling knob to 3 to not to piss off any incoming traffic. Also, quite frankly I don't belive these Mtec kits are made in Japan as the seller claims. It looks to me they are either made in China or Taiwan. I'm an electronics engineer and I think the quality of the Mtec kit is very good. Hope they can last a few years.

Things you need to prepare before the instalation:

1. The HID kit, of course

2. 10mm socket that's long enough to reach the base of the air filter

3. screw driver

4. silicone sealant

5. drill and 25mm spade drill bit and sand paper

6. some cable fasteners

Installation steps:

1. remove the engine cover, refer to the menu for this, and it's simple, just secure the fastener as they may cost you $$ if you loose them

[passenger side]

2. I did the passenger side first, unscrew the top of the windscreen washer reservoir filler, turn and pull the filler and the pipe gently, and remove the filler and the filler pipe.

3. remove the cover to the light housing that is on the side of the car, that's for the low beam.

4. drill a hole in the cover with a 25mm drill bit. Sand the drill edge smooth

5. remove the factory bulb by turning it xxxxxx-wise and pull it out. Disconnect the wire on the factory bulb from the gray socket.

6. disconnect the bulb from the short wire, place all wires through the drill hole on the light cover.

7. Attach the wire to the power cord from the HID kit. You'll need to push the pin of the power cord in the provided white socket, and make sure your blue wire from the factory power cord is connect to the red wire of the HID kit's power cord.

8. apply a good amount silicone sealant around the rubber seal and the hole you drill on the light cover.

9. place the HID bulb in the light housing socket, do this gently and don't break the bulb, you need to look carefully at the socket as the three arms of the bulb base are uneven.

10. when the bulb is securely installed, apply sillicone sealant inside the rubber sealto seal the wires and the rubber seal

11. close the light housing cover tight and connect the wires (there are three sockets you need to connect and trust me you won't get this wrong)

12. put the filler pipe back to the windscreen washer reservoir

[driver side]

13. remove the screw and the fastener on the air-intake and gently remove the air-intake

14. remove the two screws on the air-filter and remove the fastener on the air-filter hose

15. disconnect the wire going to the air-filter

16. remove the air-filter

17. you now have access to the light housing on the driver side, repeat from steps 3 to 11

18. put the air-filter back and DO NOT FORGET to reconnect that damn wire to the air-filter or you'll have the bloody "Check VSC" thrown on your dash and only disconnect your battery can fix it.

19. test the new HID lights

20. replace all engine covers

Some pictures:

the hole drilled on the light housing cover:

post-3274-1257762730_thumb.jpg

ballast installed on the passenger side:

post-3274-1257762750_thumb.jpg

how the mtec 6000K looks like on IS250

post-3274-1257762974_thumb.jpg

stock halogen (driver side) vs 6000K HID (passenger side)

post-3274-1257763390_thumb.jpg

Link to comment
Share on other sites

Hi mate,

Welcome!

Quickly, how quickly does it blow the fuse?? Are we talking minutes or days??

Something is obviously drawing a substantial amount of current to blow that fuse. Either one of the ballasts is faulty and shorting internally when it heats up, or perhaps when you plugged into the lamp sockets, they are shorting somewhere intermittently!

More info please!!!

  • Like 1
Link to comment
Share on other sites

Hello, Congrats on the fitting of your kits. The fuse blowing issue could be caused by the current draw of your ballasts at startup. I have had to use up to a 20amp fuse per side to stop the fuse blowing. Some kits even give you upgrade fuses. From memory i think the ballast put out 27000 in the start up phase so it obviously will draw a fair bit of current for the first few seconds.

Cecil

Link to comment
Share on other sites

  • 9 months later...
  • 1 year later...

Hey guys, I've just purchased an IS250 and this is the first thing I'd like to do to it! I had an accord Euro before hand and that was relatively simple... but a few things I'd like to know are..

Are these the bulb types for the IS250?

1) Low beam (projectors) - D2S

2) Fog Lights - H11

3) Parkers - T10

4) High Beam - ???

Also, if you switch out the low beams, do you need to do special leveling? or does the little twisty knob level it correctly..

Link to comment
Share on other sites

Join the conversation

You can post now and register later. If you have an account, sign in now to post with your account.

Guest
Reply to this topic...

×   Pasted as rich text.   Paste as plain text instead

  Only 75 emoji are allowed.

×   Your link has been automatically embedded.   Display as a link instead

×   Your previous content has been restored.   Clear editor

×   You cannot paste images directly. Upload or insert images from URL.


×
×
  • Create New...


Forums


News


Membership